Viewing and Deleting Segments

The Segments page is where you define the groups of users you want to target with Campaigns and Notifications. Existing Segments are shown, along with their criteria, creation date, and the login id of their creator.
Click on the name of a segment to bring up the edit segment window. Details on editing a segment are at the end of this article.
Click to check the box next to a segment name to select it, then click the red garbage can icon to delete. You can select multiple segments to delete more than one at a time.
Click on the yellow + icon to create a new segment.
Enter a segment name in the search box at the top right to filter the segments displayed.
Creating a Segment
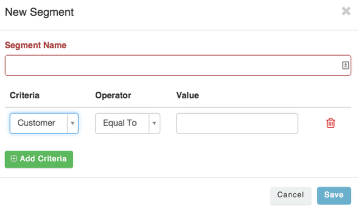
Click the yellow + icon at the top or bottom of the table to display the New Segment popup window.
Enter a name for the segment.
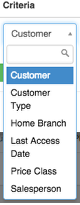
Select the Type of Criteria for the segment. Scroll down in the list to see all Criteria options.
The Criteria of Customer, Customer Type, Home Branch, Price Class, Salesperson, Select Code, and Territory all come from Eclipse. Please be sure the values you enter to match these Criteria types is exactly as it appears in Eclipse.
The User Type Criteria comes from the Portal and the Last Access Date Criteria comes from the Innovo App.
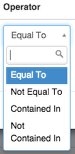
Select the Operator for the segment. The choices differ depending on the Criteria selected.
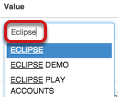
Enter a value. You must enter at least 3 characters.
If you have selected the Customer Criteria, As you type, any matching results from eclipse will be displayed below the text entry field. In the example above, entering Eclipse displays customer names containing Eclipse.
Add more values to a given criteria

You can add more than one value for a given criteria. After selecting the first value (in this case Maple Leaf Contracting, click enter and type in another value. In the example above, the MAP value was entered again, and a second customer (Maple Leaf Pepsi Project) is selected.
Or you can add the same criteria again, adding a different value. Users matching either criteria will be added to the segment.
Add more criteria to the segment

You can also add more than one criteria to your segment. Click the green Add Criteria button and select the criteria, operator, and enter your value(s).
To delete a criteria, click on the garbage can icon to the right.
Once you have setup the segment, click the blue save button to save your work. Clicking cancel will discard any changes to existing Segments or cancel the segment creation for new segments.
Note: If there is more than one criteria in a segment, they are additive. For the example shown above, this Segment targets all Customer's with a Customer Type of ELECTRICAL and also have a Home Branch of branch 1.

After clicking Save in the New Segment window, you are returned the the Segments listing and your new segment will appear in the listing.
Editing or Deleting a Segment

To edit an existing segment, click on the segment's name. This brings up the same popup window as starting a new segment, only with the existing segment's information in place. From that point forward, changing the segment name and adding/editing/deleting criteria is the same as it is for new segments as described earlier in this article.
To delete an existing segment, check the box next to the segment's name, then click the red trash can icon. To delete multiple segments at once, check the boxes next to all segments to be deleted, then click the red trash can icon.
Comments
Please sign in to leave a comment.